Homemade kimchi
Posted: March 13, 2013 Filed under: Recipes, Wellness | Tags: Healthy, kelly schreuder, kimchi, korean, recipes, Wellness Leave a commentI’m often amused at how the world works. A few weeks ago I tweeted, asking where I could find kimchi in Cape Town. I first tasted the Korean vegetable dish at Tokara last year. It had the most incredible tarty, pickled sweet taste and complimented the meat perfectly.
My kimchi prayer was answered when Kelly Schreuder, a Cape Town dietician replied to my tweet and offered to make me some! I was so touched by Kelly’s gesture that I asked her if she would consider doing a guest post. To my delight she obliged. We met up at &Union last night for the exchange of the magical jar of kimchi and ended up having a LOT to talk about.
So without further ado, Kelly – take it away!
– Making kimchi is one of the most satisfying culinary experiences you’ll ever have, I promise! It is easy and delicious and it takes very little time to make enough to last a few weeks or months, but has the same feel as something like gardening, or making marmalade with your grandmother – an old-world tradition or ritual where you just know that the benefits are far greater than the material results – and the best part is that it is really good for you too.
Kimchi is a Korean pickle or condiment made with cabbage as a base. Honestly I do not know much about the real Korean culture behind kimchi. I say that because I have never been to Korea and watched people make and eat it there, so I am no authority on those details. It was first introduced to me by Andrea Potter (a holistic nutritionist and chef ) when I lived in Vancouver in 2010 and the first time I tried it was the batch of homemade kimchi given to me by Kari – a friend of mine from culinary school.
For the uninitiated, kimchi is a delicious spicy pickle with the distinctive “Asian” character that comes from ingredients like chilli, ginger, spring onions and garlic. In the same way that a slice of pickle completes a burger, kimchi completes my noodles, miso soup, rice paper spring rolls, grilled fish, stir fry and anything else that I think needs a bit of life.
Health Benefits
Kimchi is made by natural fermentation in a salty brine, so the vinegary acidity that you taste in the final product is not added, it is actually a by-product of lactic acid fermentation by the same probiotic bacteria that make yoghurt. Fresh kimchi (before fermentation) just tastes like salty, spicy coleslaw and it is left for a few days to allow the bacteria to work their magic.
Apart from being a source of probiotics, the fermentation process also results in higher levels of antioxidants such as vitamin C. There has been a study that showed the addition of fermented kimchi to the daily diet of 100 Korean men was associated with improvements in cholesterol levels, carbohydrate metabolism and weight loss.
The extra fibre from the vegetables and the potential metabolic-boosting effects of the chilli add to the appeal from a health perspective. The role of pickles is also to stimulate saliva production, which, along with the healthy bacteria, aids the digestion of whatever else is eaten with that meal.
The saltiness is the only downside to kimchi, so those with blood pressure concerns should be cautious about how much they eat. There is usually no need to add extra salt to a meal when you are eating kimchi.
Ingredients
Korean kimchi is made with Napa cabbage and daikon (a large white radish), both of which are difficult to find here in South Africa. I use local ingredients where possible, so the result is not traditional (the small red radishes we use are much hotter than daikon), but it is pretty close and it makes more sense to me to use what is available here. I chose to leave out ingredients like dried shrimp and fish sauce, so the version I make is raw, vegan and slightly less pungent than it would be with the shrimp.
2 kg cabbage – you do not need to weigh this before, just adjust the salt quantity if you have more or less cabbage. Use approximately 1 tablespoon of sea salt per ½ kg cabbage.
1 bunch small red radishes (about 10-12)
6 medium carrots
1 bunch spring onions
1 green apple
3-4 inch piece of ginger
6 medium garlic cloves
¼ – 1/3 chilli flakes
¼ cup good sea salt (or 1 tablespoon per ½ kg cabbage)
Equipment
– Cutting board and knife
– Large bowl and/or ceramic or glass container for mixing and storage. I used a Le Creuset storage container. Do not use metallic containers.
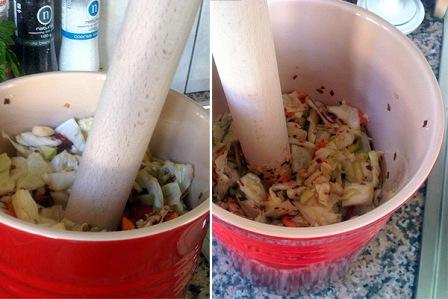
OPTIONAL: Something to help with the initial breakdown of the cabbage in case you get tired of using your hands. I used a wooden rolling pin without handles to help with the “pounding” of the ingredients to draw more water out of them.
OPTIONAL: food processor for making a spice paste. This is traditional, but not essential – you still get a good result if you just finely chop the ginger the garlic.
Items for weighing down the ingredients during fermentation so they are always covered in the brine. I used a plate and a kilogram bag of salt as a weight.
Method
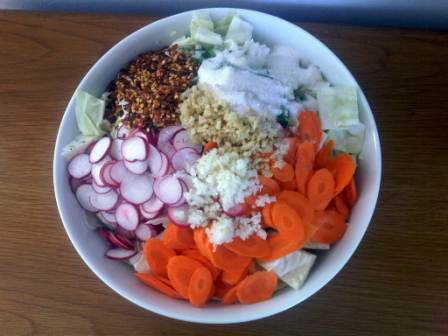
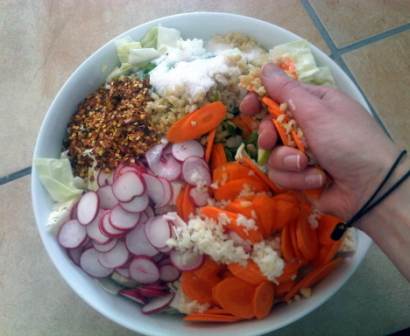
1) Rinse all the vegetables. Chop cabbage into bite-sized pieces, and slice the radishes and carrots. Julienne the apple and slice the spring onions. Put all the prepared vegetables into the large bowl/container.
2) You can either use a food processor to make a paste with the garlic, ginger and chilli first, or you can just finely chop those ingredients and add them to the vegetables.
3) Add the salt and then use your hands to mix all the ingredients together. You have to work at squeezing everything and mixing vigorously for about 5 minutes to get the vegetables to release fluid. I use my hands at first to distribute the ingredients evenly and then I pound them with a wooden rolling pin for a few minutes to help to break them down further.
4) Taste the mixture – it should be pleasantly salty. If it does not taste salty like a pickle, add an extra pinch of salt until it tastes right.
5) When you can see some fluid is released, pack the vegetables neatly and weigh them down. They might not be fully covered at first, but check on them after about an hour or two and you will notice the water level rise as the salt draws more fluid out.
6) Cover the top of the container loosely with a cloth to prevent anything from getting inside, but not with a tight-fitting lid – you want carbon dioxide to escape.
7) Leave the jar on the counter for 2-5 days and taste it every day to see how it changes. You can leave it there for 2 weeks or more if you want a full fermentation and maximum benefits, but the first time you try this you might prefer a fresher taste. If the kimchi goes bad you will know immediately because it will look, smell or taste really terrible, so don’t worry, you will notice! If that happens, just throw it out and try again.
8) Once the kimchi has reached a stage of pickling that you like, you can transfer it to the fridge, either in the same container with a lid, or into closed glass jars, where it will keep for several months.
Kelly Schreuder – Registered Dietician & Private Chef
Combining her dietetics and professional culinary backgrounds, Kelly has a deep understanding of how to use food to enhance health and get the most from your body. She runs her dietetics practice at the Velocity Sports Lab in Hout Bay, Cape Town, and offers private or group cooking demonstrations.
Twitter: @CTdietician
Email: klschreuder@ctdietician.co.za
Phone: 082 321 8463
Buchu Tea
Posted: July 29, 2011 Filed under: Tea, Wellness | Tags: Buchu, Health, South Africa, Tea, Wellness 5 CommentsSo I went to see the oral hygienist the other day, such a nice lady…except that she made me feel like I never take care of my teeth, which I do! I really do.
‘Do you drink a lot of coffee and red wine?’ she asked. What was I going to do? Lie to her? With her fists still deep inside my mouth I nodded slightly.
‘Hmmm, I can see a bit of staining here and there. Do you also drink tea?’
DO I DRINK TEA??!!! She clearly didn’t know who she was dealing with here. I mean, my second name might as well have been tea.
‘Yes, a lot.’ I answered. And before she could even continue I had already decided in my mind that whatever it was she was going to say to me, would not deter me from my tea (or chocolate).
Luckily she just told me to floss more…which I can live with. Now I can’t imagine that this tea would give your teeth stains but who cares, it’s so delicious! It’s called Buchu tea and I can’t believe it’s taken me so long to try because I’m already fairly familiar with Buchulife sparkling water.
Made by Cape Moondance, a local company based in Stellenbosch, the tea is produced from the buchu plant, which is a traditional healing herb. The plant is protected and can be found growing naturally in the Western and Southern Cape of South Africa.
It is believed that the Koisan first used buchu to cure illnesses but also drank it during dances and rituals when the moon was full. So this product really is deeply rooted in South African soil. The health benefits (of which there are many) can be found on the Cape Moondance website, but just to mention a few:
-Good antiseptic and natural anti-inflammatory
-Detox agent, helping to rid the body of any excess water
-Aids digestion
-Helps in the prevention of cystitis as well as prostate and kidney problems
-Good for weight management
-Anti-spasmodic
-Used as general health tonic and to promote overall well-being
The tea itself is not bland and ghastly-tasting as one might imagine. The flavour is quite minty with a eucalyptus character. I find this refreshing and at the same time, soothing (My olfactory system is quite sensitive so it reminds me very much of the Issey Miyake fragrance, A Scent. Strange, I know!). The mouth feel is silky smooth with an aftertaste that leaves a feeling of cleanliness.
The tea is also free of any caffeine and is 100% natural. All the leaves are hand-picked and the tea is BRC certified (global standard for food safety). Now…are there any other reasons you need before you try this?! A box of Buchu tea leaves retails for around R26. It also comes in teabag form for your convenience.
xxx
Meet Sharon Fruit
Posted: June 28, 2011 Filed under: Recipes, Wellness | Tags: Baking, Cream cheese, Fruit, Health, Poppyseeds, recipes, Roulade, Sharon Fruit, Superfood, Wellness Leave a commentSharon who??
There’s a new girl in the fruit Dept, and she’s HOT!
Having missed winter in South Africa last year, I was almost (dare I say it?) excited, for the wonderful seasonal fruits that we get here at this time of the year.
Think oranges, avocado’s (yes, they’re a fruit), quinces and gooseberries. I always feel that especially during winter it’s important to eat a few pieces of fresh fruit each day, just to pump up the intake of essential vitamins and antioxidants. And really it’s much more pleasing than gulping down a big old pill.
The only downside, if I must be honest, is that sometimes when I’m in rush I find it a real pain and inconvenience to have to peel an orange or take the seeds out of a pawpaw, so it was to my utter delight a month or two ago, that I came across Sharon fruit.
Don’t you just love the name? Definitely more catchy than “Guava” or “Pear”.
Not only is Sharon fruit dreadfully easy to prepare (in fact- you don’t even need to do anything except bite into its juicy, star-imprinted flesh!) it also comes with an extensive list of health benefits to boot!
Originating in China, the fruit is a seedless variety of the persimmon group and it’s only grown in Spain, Israel and South Africa, so we are the only ones that produce it in the southern hemisphere!
The fruit is grown in the beautiful region of Swellendam in the Western Cape and you can find it at most supermarkets as well as fresh produce stands at outdoor foodie markets.
We’ve all heard the saying “an apple a day keeps the doctor away”, well it must be noted that Sharon fruit has twice the amount of fibre than that of an apple. It also contains high levels of anti-oxidants known for fighting heart disease and cancer as well as possessing a good deal of calcium, magnesium and potassium. I’ve also been told it is a great recovery food after a night of heavy drinking.
Having enjoyed Sharon fruit in a number of different ways, I must say the best is simply reaching for it out of the fridge, cutting it into thick wedges and munching on it as a snack when my energy levels start to drop. This, together with a handful of home-made granola, beats a sugar-laden chocolate bar any day!!
Just to show you how versatile this Super-food really is, I have included a recipe for a sweet roulade that I made this week, which I’m sure would go down well at any office tea party or the end of a long leisurely brunch when you feel the need to nibble on something sweet while paging through the weekend papers.
See, now you CAN have your cake and eat it!
Sharon Fruit Roulade with Poppy seed Cream cheese filling
Ingredients:
3 eggs at room temperature, separated
1 cup sugar
2/3 cup *Sharon Fruit puree
¾ cup cake flour
1 tsp Vanilla
1 tsp lemon juice
1 tsp Baking powder
Filling:
1 tub smooth cream cheese
4 Tbps butter
1 cup icing sugar
2 Tbps Poppy seeds
Method:
*For the puree, simply peel 4 Sharon fruit and liquidise in a blender.
Preheat the oven to 180 degrees C. Beat the egg yolks and sugar together for about ten minutes. When done, the mixture will be very thick and very, very pale. Add the lemon juice, vanilla and Sharon fruit puree and stir gently.
In another bowl, combine the flour, baking powder and salt. Fold the dry ingredients into the wet and mix just until combined.
Beat the egg whites to soft peak and gentle fold into the batter.
Pour the batter onto a baking sheet that has been greased and lined with wax paper. Spread out the batter evenly and bake for fifteen minutes, or until golden.
Let cool on the pan for about ten minutes and start your filling.
Whip the cream cheese and butter together for three minutes or until creamy. Add the icing sugar, vanilla and poppy seeds. Whip on high for another six minutes. Set aside.
After you have cooled the cake for a few minutes, turn over the baking sheet and gently peel off the wax paper. Spoon the filling on top of the cake and spread out. Starting at the far edge, roll up the cake. Wrap in cling wrap and chill in the fridge for about an hour before serving.
For more information about Sharon Fruit, visit www.sharonfruit.com or follow @sharontmfruit on twitter for updates.
xxx
Teatime Tuesday
Posted: April 26, 2011 Filed under: Tea, Wellness | Tags: Ginger, Health, Organic, Tea, Wellness Leave a commentWhat woke me this morning was not my alarm, but rather the gushing and wooshing sound of the icy wind that whipped its way through the Cape Town city bowl. Enveloped in my little cacoon of a duvet, I felt like Dorothy being carried off in a tornado. No, really! One thing I could be sure of- I did NOT want to leave my bed!
Once I came around to the idea that I actually had no choice, I braved the kitchen and its terrifyingly ice cold tiles to switch the kettle on. Tea was what I needed. A hot, steaming cup of warmth.

Those that know me well, won’t deny the fact that I love Green tea, and I recently was given this Qi ginger one by my mom who knows that I enjoy making my own fresh ginger honey tea AND that I have a penchant for green tea- best of both worlds! (see where I’m going with this?)

So I decided it would be the perfect thing to warm me up on an icy morning like today. Although ginger is traditionally used to aid digestion, it also helps in warding off winter ailments.
This tea is made of 40% green tea with 39% ginger and then some apple and orange flavour. What I enjoy about it is that the ginger doesn’t overpower and the sweet spiciness doesn’t burn your throat like it can do sometimes. It’s produced by Fairtrade and is 100% organic. You can get a box of 25 bags for around R29.00 at most health/wellness type places- and I know they stock it at Giovanni’s 🙂

On a different note- I’m feeling inspired today to bake something with coconut. Actually I think I’m just coveting the smell of toasted coconut in my house on a cold day. Is there anything better?!


